For this walkthrough I will be using Cisco UCS blade and rack servers. Also in use is Cisco VM-FEX technology which leverages the Nexus 1000v Virtual Ethernet Module (VEM) so this component will need to be installed along with the drivers for Cisco's VIC1280 Converged Network Adapter (CNA).
You may wonder why it is that I'm using a customised image based off VMwares standard ESXi source instead of the Vendor supplied ESXi image. The answer is quite simple; on every project I've ever worked on the Vendor supplied installation media is always several versions behind. At the time of writing this post Cisco only has a Cisco branded ESXi image up to version 5.0 and what I need right now is 5.1. In my experience it is always better to take the VMware branded image and add the components required.
The first step is to download the ESXi ZIP bundle and the driver bundles for the Nexus 1000v and the CNA card, and then store them in a temporary location. Specifically the files I'm working with for this post are;
- ESXi510-201210001.zip
- Nexus1000v.4.2.1.SV2.1.1.zip
- enic_driver_2.1.2.22-564611.zip
- fnic_driver_1.5.0.8-758653.zip
Now we need to pull the offline bundles out of the driver packages. We are looking for a zip file inside the zip file with the following folders/files in the root;
- vib20
- index.xml
- metadata.zip
- vendor-index.xml
- VEM510-20121019150119-BG-release.zip
- enic_driver_2.1.2.22-offline_bundle-564611.zip
- fnic_driver_1.5.0.8-offline_bundle-758653.zip
Now it is time to launch PowerCLI and create the image. It is important to note that all data within this session will disappear once the PowerCLI window is closed. Before closing this window at the end of the walkthrough make sure to save both the ISO and ZIP files for easy re-import next time walking through this process.
Add the ESXi image and driver bundles to the Software Depot repository.
- Add-EsxSoftwareDepot E:\Temp\ESXi510-201210001.zip
- Add-EsxSoftwareDepot E:\Temp\VEM510-20121019150119-BG-release.zip
- Add-EsxSoftwareDepot E:\Temp\enic_driver_2.1.2.22-offline_bundle-564611.zip
- Add-EsxSoftwareDepot E:\Temp\fnic_driver_1.5.0.8-offline_bundle-758653.zip

List all current ESXi image profiles, make a new image profile by copying
the existing standard image and then list the components that are going to be added. The asterisk (*) can be used as a wildcard in PowerCLI.
- Get-EsxImageProfile | FT Name, Vendor

Add each of the required packages to the newly created image.
- Add-EsxSoftwarePackage -ImageProfile ESXi-5.1.0-b838463 cisco-vem-v150-esx
- Add-EsxSoftwarePackage -ImageProfile ESXi-5.1.0-b838463 net-enic
- Add-EsxSoftwarePackage -ImageProfile ESXi-5.1.0-b838463 scsi-fnic

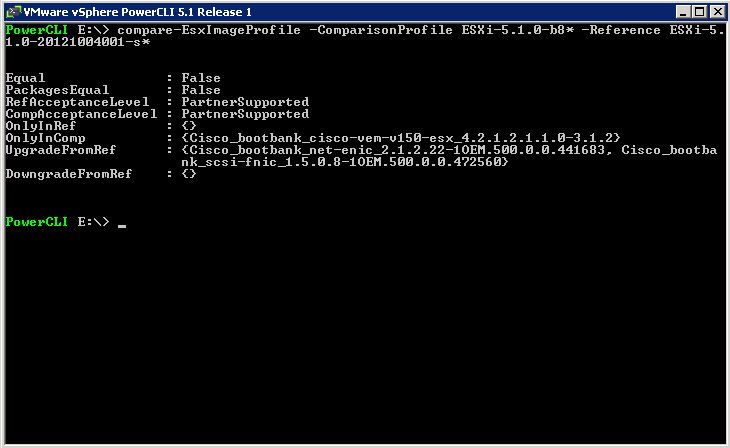
Compare the source profile to the newly created profile and confirm that
the extra components have been added.
- Compare-EsxImageProfile -ComparisonProfile ESXi-5.1.0-b8* -Reference ESXi-5.1.0-20121004001-s*
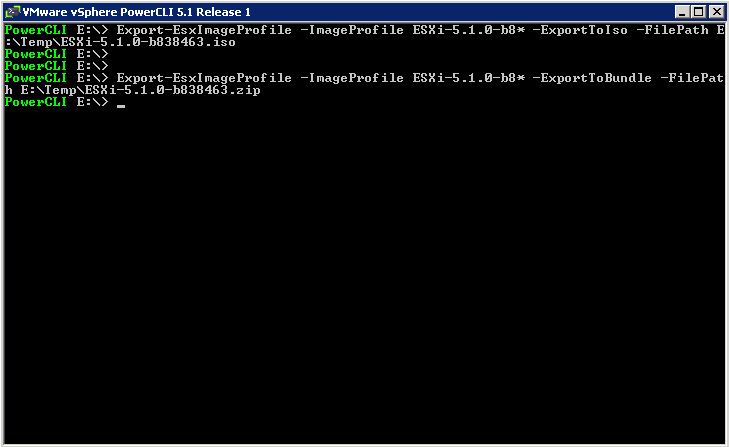
Export the image to be used as an ISO and ZIP bundle. The ZIP bundle is required for easy re-import into a PowerCLI session.
- Export-EsxImageProfile -ImageProfile ESXi-5.1.0-b8* -ExportToIso -FilePath E:\Temp\ESXi-5.1.0-b838463.iso
- Export-EsxImageProfile -ImageProfile ESXi-5.1.0-b8* -ExportToBundle -FilePath E:\Temp\ESXi-5.1.0-b838463.zip
Now the ISO file can be used as a normal ESXi build disc. Attach it to your host and build the OS.
The ZIP bundle can be used to re-import the Image back into PowerCLI for editing and updating.
This process is just one of many ways to get extra drivers installed into ESXi. The reason I like this method is that you only need to do it once and then roll out the image to the hosts.